The Ultimate Guide to Perfect Pan-Seared Chicken Breast Every Time
Pan-seared chicken breast is a classic, versatile dish that’s a staple in kitchens worldwide. Whether you’re a beginner or an experienced cook, mastering the art of pan-searing chicken breast ensures juicy, flavorful results every time. This guide will walk you through everything you need to know—from selecting the best chicken to expert cooking techniques and delicious serving ideas.
Why Pan-Seared Chicken Breast?
Pan-searing is one of the quickest and easiest ways to cook chicken breast while locking in moisture and flavor. Unlike baking or grilling, pan-searing creates a beautiful golden-brown crust (the Maillard reaction) that enhances taste and texture. Plus, it’s a lean protein option that pairs well with countless sides, making it perfect for meal prep and healthy eating.
Key Benefits of Pan-Seared Chicken Breast:
✅ Fast & Easy – Ready in under 20 minutes
✅ Versatile – Works with countless seasonings and sauces
✅ Healthy – High in protein, low in fat (when skinless)
✅ Meal-Prep Friendly – Stays fresh for days
Choosing the Best Chicken Breast for Pan-Searing
1. Fresh vs. Frozen Chicken Breast
-
Fresh: Best for immediate cooking, often more tender.
-
Frozen: More economical, but must be thawed properly (in the fridge overnight or under cold water).
2. Bone-In vs. Boneless
-
Boneless, skinless: Quickest to cook, leaner, but can dry out if overcooked.
-
Bone-in, skin-on: More flavorful and juicy, but takes longer to cook.
3. Organic, Free-Range, or Conventional?
-
Organic: No antibiotics, higher welfare standards.
-
Free-range: Better flavor, more ethical.
-
Conventional: Budget-friendly, widely available.
4. Even Thickness for Even Cooking
Chicken breasts are often uneven, leading to overcooked thin parts and undercooked thick parts. Solution:
-
Pound them evenly (¼ to ½ inch thick) using a meat mallet.
-
Butterfly them (slice horizontally and open like a book).
Essential Tools for Pan-Searing Chicken Breast
-
Heavy Skillet – Cast iron or stainless steel for even heat distribution.
-
Tongs or Spatula – For flipping without piercing (keeps juices inside).
-
Meat Thermometer – Ensures perfect doneness (165°F / 74°C).
-
Meat Mallet – For even thickness.
-
Paper Towels – Patting chicken dry ensures better browning.
Step-by-Step Guide to Perfect Pan-Seared Chicken Breast
Step 1: Prep the Chicken
-
Pat dry – Excess moisture prevents browning.
-
Season generously – Salt, pepper, and optional spices (paprika, garlic powder, thyme).
-
Optional brine (30 min) – Soak in saltwater (1 tbsp salt per cup of water) for juicier meat.
Step 2: Heat the Pan
-
Use medium-high heat.
-
Add 1-2 tbsp oil (avocado, canola, or olive oil—high smoke point oils work best).
Step 3: Sear the Chicken
-
Place chicken in the pan, don’t overcrowd.
-
Cook undisturbed for 5-7 minutes until golden brown.
-
Flip and cook another 5-7 minutes (or until internal temp reaches 165°F).
Step 4: Rest Before Serving
-
Let it rest 5 minutes to redistribute juices.
Pro Tips for Juicy Pan-Seared Chicken Breast
🔥 Avoid Overcooking – Use a meat thermometer.
🍋 Add Acid – Lemon juice or vinegar brightens flavor.
🧈 Baste with Butter – For extra richness.
🌿 Finish with Herbs – Fresh parsley, thyme, or rosemary.
Common Mistakes & How to Avoid Them
❌ Using a Cold Pan → Heat pan first.
❌ Moving Chicken Too Soon → Let it sear undisturbed.
❌ Overcrowding the Pan → Cook in batches.
❌ Skipping the Resting Step → Keeps it juicy.
Delicious Pan-Seared Chicken Breast Variations
1. Garlic Butter Pan-Seared Chicken Breast
-
Add minced garlic and butter in the last 2 minutes of cooking.
2. Lemon Herb Pan-Seared Chicken Breast
-
Finish with lemon zest, juice, and fresh herbs.
3. Spicy Cajun Pan-Seared Chicken Breast
-
Coat with Cajun seasoning before searing.
4. Honey Mustard Glazed Pan-Seared Chicken Breast
-
Brush with honey mustard sauce after cooking.
Best Side Dishes for Pan-Seared Chicken Breast
-
Roasted Vegetables (asparagus, broccoli, carrots)
-
Mashed Potatoes or Cauliflower Mash
-
Quinoa or Rice Pilaf
-
Fresh Salad (Caesar, Greek, or spinach salad)
The Science Behind Perfectly Pan-Seared Chicken Breast
Pan-searing chicken breast might seem simple, but achieving that perfect golden crust while keeping the inside juicy requires understanding a few key scientific principles. Let’s break down the Maillard reaction, heat control, and moisture retention to help you cook the best pan-seared chicken breast every time.
1. The Maillard Reaction: Why Browning = Flavor
When chicken hits a hot pan, the proteins and sugars undergo the Maillard reaction, a chemical process that creates complex flavors and a beautiful brown crust. This reaction occurs at temperatures above 285°F (140°C), which is why:
-
Preheating the pan is crucial – A cold pan won’t sear properly.
-
Dry the chicken thoroughly – Excess moisture lowers the pan’s temperature, leading to steaming instead of searing.
-
Don’t overcrowd the pan – Adding too much chicken at once drops the heat, preventing proper browning.
2. Heat Control: The Key to Even Cooking
Chicken breast is lean, meaning it has little fat to keep it moist during cooking. Controlling heat ensures it cooks evenly without drying out.
-
Medium-high heat is ideal – Too low, and the chicken steams; too high, and the outside burns before the inside cooks.
-
Use a heavy-bottomed pan (cast iron or stainless steel) – These distribute heat evenly, preventing hot spots.
-
Oil with a high smoke point – Avocado, canola, or grapeseed oil can handle high heat without burning.
3. Moisture Retention: How to Keep Chicken Juicy
No one likes dry chicken. Here’s how to lock in moisture:
-
Brine the chicken (optional but effective) – Soaking in saltwater (1 tbsp salt per cup of water for 30+ minutes) helps the meat retain moisture.
-
Don’t pierce the chicken while cooking – Using tongs instead of a fork prevents juices from escaping.
-
Rest before slicing – Letting the chicken sit for 5 minutes allows juices to redistribute.
Bonus Tip: Carryover Cooking
Even after removing chicken from heat, residual heat continues cooking it (carryover cooking). To prevent overcooking:
-
Remove chicken at 160°F (71°C) – It will rise to 165°F (74°C) while resting.
By mastering these principles, you’ll consistently achieve crispy, golden-brown exteriors and tender, juicy interiors—the hallmarks of perfectly pan-seared chicken breast.
Step-by-Step Guide to Pan-Seared Chicken Breast (With Visual Cues)
Want foolproof pan-seared chicken breast? Follow this detailed, visual guide to avoid common mistakes and get restaurant-quality results at home.
Step 1: Prep the Chicken
-
Pat dry – Use paper towels to remove surface moisture (wet chicken won’t brown well).
-
Pound to even thickness (¼ to ½ inch) – Ensures even cooking.
-
Season generously – Salt, pepper, and optional spices (garlic powder, paprika, or herbs).
Step 2: Heat the Pan Correctly
-
Use a heavy skillet (cast iron or stainless steel).
-
Heat over medium-high for 2-3 minutes until hot.
-
Add 1-2 tbsp oil (should shimmer but not smoke).
Step 3: Sear the First Side
-
Place chicken in the pan without overcrowding.
-
Don’t touch it for 5-7 minutes – You should see:
-
Edges turning opaque (about 2 minutes in).
-
Golden-brown crust forming (after 5+ minutes).
-
Step 4: Flip and Finish Cooking
-
Gently flip with tongs.
-
Cook another 5-7 minutes or until:
-
Internal temp reaches 165°F (74°C).
-
Juices run clear (no pink).
-
Step 5: Rest and Serve
-
Transfer to a plate and let rest 5 minutes (keeps it juicy).
-
Slice against the grain for maximum tenderness.
Visual Doneness Cues:
✔ Raw: Pink, soft, translucent.
✔ Perfectly Cooked: Opaue white, firm but springy, juices clear.
❌ Overcooked: Dry, stringy, tough.
This method guarantees crispy skin (if using skin-on) and succulent meat—every time.
Flavor Variations & Advanced Techniques for Pan-Seared Chicken Breast
Once you’ve mastered the basics, try these gourmet twists and pro techniques to elevate your pan-seared chicken breast.
1. Flavor Boosters Before Cooking
-
Dry Brine – Salt chicken 1 hour ahead for deeper seasoning.
-
Marinate – Try yogurt-based marinades (tandoori-style) or citrus-herb blends.
-
Herb-Butter Under the Skin (for skin-on breasts) – Adds richness.
2. Pan Sauces (Restaurant-Worthy Finishes)
After removing chicken, use the same pan to make:
-
Lemon Garlic Sauce – Deglaze with white wine, add butter, garlic, and lemon juice.
-
Creamy Mushroom Sauce – Sauté mushrooms, add cream, thyme, and Dijon mustard.
-
Balsamic Glaze – Reduce balsamic vinegar with honey for a sweet-tart finish.
3. Global Flair: Seasoning Inspirations
-
Italian – Rosemary, garlic, sun-dried tomatoes.
-
Mexican – Chili powder, cumin, lime.
-
Asian – Soy sauce, ginger, sesame oil.
4. Reverse Searing (For Extra-Thick Breasts)
-
Oven Finish – Sear first, then bake at 375°F (190°C) until fully cooked.
-
Sous Vide + Sear – Cook chicken in a water bath first, then crisp in a pan.
5. Leftover Makeovers
Turn leftovers into:
-
Chicken Caesar Wraps
-
Chopped Salad Topper
-
Stir-Fry Protein
Meal Prep & Storage Tips
-
Fridge: Store cooked chicken in an airtight container for 3-4 days.
-
Freezer: Freeze for up to 3 months (best for soups or casseroles later).
-
Reheating: Warm in a skillet with a splash of broth to retain moisture.
FAQs About Pan-Seared Chicken Breast
1. How do I know when pan-seared chicken breast is done?
Use a meat thermometer—165°F (74°C) at the thickest part.
2. Why is my chicken dry?
Overcooking is the #1 culprit. Brining and proper resting help.
3. Can I pan-sear frozen chicken breast?
Not recommended—thaw first for even cooking.
4. What’s the best oil for pan-searing?
High smoke point oils like avocado, canola, or grapeseed.
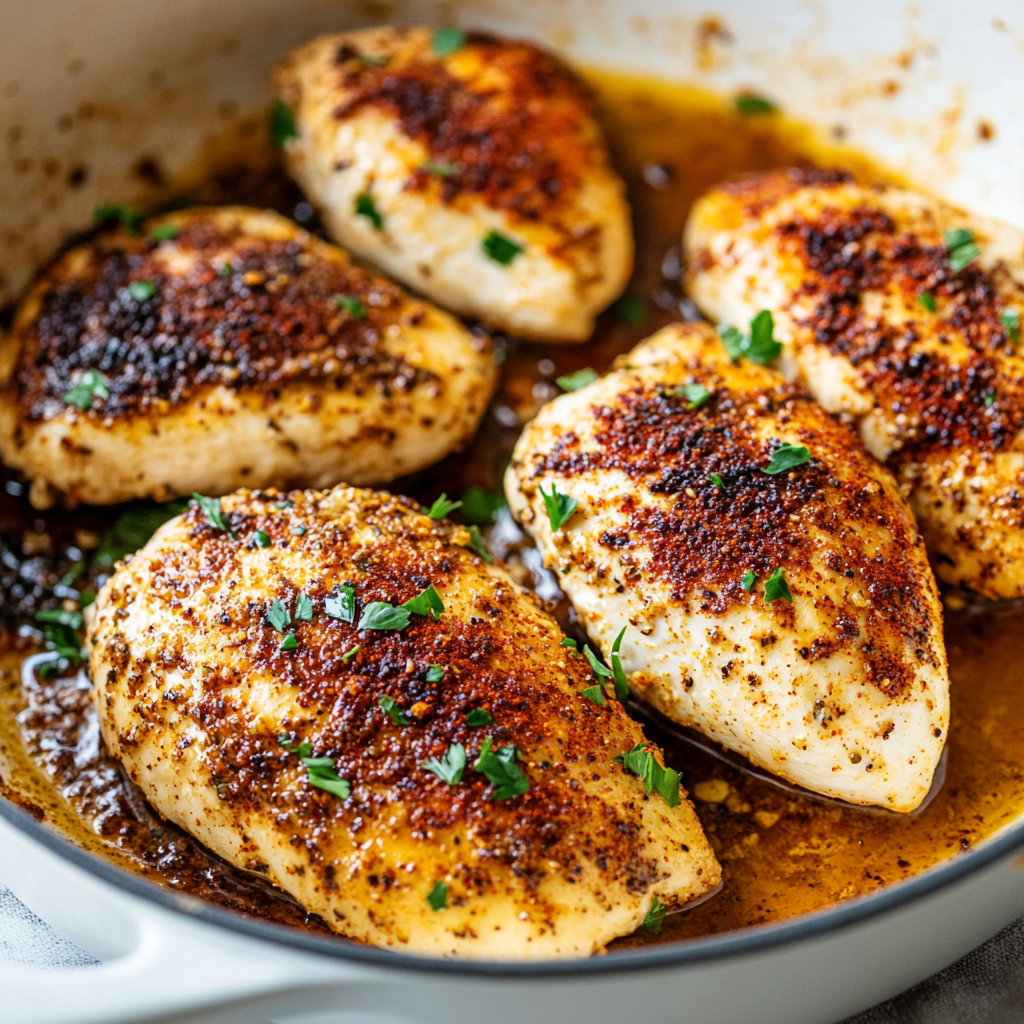
The Ultimate Guide to Perfect Pan-Seared Chicken Breast Every Time
Back when weeknights were hectic but family dinners were sacred, this pan-seared chicken was a lifesaver—crispy, golden on the outside, juicy and tender inside. It’s a no-fuss recipe that makes a quiet meal feel just a bit more special. With just a skillet and a few staples, you’re all set for a satisfying dish that never fails.
- Prep Time: 5 minutes
- Cook Time: 12 minutes
- Total Time: 17 minutes
Ingredients
-
2 boneless, skinless chicken breasts
-
Salt and black pepper, to taste
-
1/2 tsp garlic powder
-
1/2 tsp paprika
-
1 tbsp olive oil
-
1 tbsp butter
Instructions
-
Pat chicken dry with paper towels.
-
Season both sides with salt, pepper, garlic powder, and paprika.
-
Heat olive oil in a skillet over medium-high heat.
-
Place chicken in pan smooth-side down. Cook for 5–6 minutes without moving.
-
Flip, add butter to the pan, and cook another 5–6 minutes, spooning butter over the top.
-
Check that internal temperature reaches 165°F.
-
Rest for 5 minutes before slicing and serving.
Notes
-
Press gently on the chicken to sear evenly and get that beautiful crust.
-
Use a meat thermometer for perfect doneness—no guesswork!
-
Letting the chicken rest keeps it extra juicy.
Nutrition
- Calories: 280 kcal per serving
- Fat: 16g
- Carbohydrates: 1g
- Protein: 32g
Conclusion: Mastering Pan-Seared Chicken Breast
Pan-seared chicken breast is a quick, healthy, and delicious meal that’s perfect for any occasion. By following these tips—choosing the right chicken, prepping properly, and mastering the sear—you’ll get juicy, flavorful chicken every time. Experiment with different seasonings and sides to keep meals exciting!