
The Ultimate Guide to Key Lime Cookies: A Zesty, Buttery Delight
If you’re a fan of tangy, sweet treats, then Key Lime Cookies are about to become your new obsession. These delightful cookies combine the rich, buttery goodness of classic cookies with the bright, zesty flavor of key lime pie. Whether you’re a seasoned baker or a beginner, this comprehensive guide will walk you through everything you need to know about making the perfect Key Lime Cookies—from ingredients and step-by-step instructions to storage tips and variations.
Why You’ll Love These Key Lime Cookies
Before we dive into the recipe, let’s talk about what makes these Key Lime Cookies so special:
✅ Bursting with Real Key Lime Flavor – Made with fresh key lime zest and juice, these cookies deliver an authentic citrus punch.
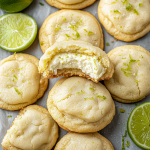
✅ Creamy Cheesecake Filling – Each cookie is stuffed with a velvety lime-infused cheesecake center.
✅ Soft, Buttery Texture – The cookie base is perfectly tender with just the right amount of crispness.
✅ Easy to Make – No complicated techniques required!
✅ Perfect for Any Occasion – Great for summer picnics, holiday baking, or just a sweet afternoon snack.
Now, let’s get baking!
Key Lime Cookies Recipe
Ingredients You’ll Need
Key Lime Cheesecake Filling
▢ 12 Tbsp (170g) cream cheese (softened, regular or vegan)
▢ 4½ Tbsp powdered sugar (adjust if using regular cream cheese)
▢ 1 Tbsp key lime zest (from 3-4 key limes)
▢ 1 tsp key lime juice (freshly squeezed or store-bought)
Key Lime Cookies
▢ 1 cup (226g) butter (softened)
▢ ¾ cup (150g) white sugar
▢ ¼ cup (50g) light brown sugar
▢ 2 Tbsp key lime zest (from 4-5 key limes)
▢ 1 large egg
▢ 2 tsp vanilla extract
▢ ½ Tbsp key lime juice
▢ ¼ tsp salt
▢ 1 tsp baking soda
▢ 2¾ cups (344g) all-purpose flour
Step-by-Step Instructions
Step 1: Prepare the Key Lime Cheesecake Filling
-
In a mixing bowl, combine softened cream cheese, powdered sugar, key lime zest, and key lime juice.
-
Mix until smooth and creamy.
-
Line a plate or small baking sheet with parchment paper.
-
Scoop 23 heaping teaspoons of the filling onto the parchment paper.
-
Freeze for 45 minutes (or longer if using vegan cream cheese).
🔹 Pro Tip: Freezing the filling ensures it stays intact when baking and doesn’t melt too quickly.
Step 2: Make the Cookie Dough
-
In a large bowl, beat together butter, white sugar, brown sugar, and key lime zest until light and fluffy.
-
Add the egg, vanilla extract, and key lime juice, mixing until fully combined.
-
Gradually add flour, baking soda, and salt, mixing until just incorporated.
🔹 Note: The dough should be slightly crumbly but hold together when pressed.
Step 3: Assemble the Cookies
-
Preheat oven to 350°F (175°C) and line baking sheets with parchment paper.
-
Scoop 2-tablespoon portions of dough and roll into balls.
-
Remove the frozen cheesecake filling from the freezer.
-
Press a filling ball into the center of each cookie dough ball, then seal the dough around it.
-
Place shaped cookies on the baking sheet, spacing them 2 inches apart.
Step 4: Bake to Perfection
-
Bake one sheet at a time for 9-12 minutes, until edges are lightly golden.
-
While one batch bakes, keep the remaining dough in the fridge.
-
Let cookies cool on the baking sheet for 5 minutes before transferring to a wire rack.
🔹 Pro Tip: For extra zing, sprinkle additional key lime zest on top right after baking!
The History and Popularity of Key Lime Cookies
Key lime desserts have long been a favorite in American cuisine, with Key Lime Pie reigning as the most iconic treat. But in recent years, Key Lime Cookies have surged in popularity, offering a portable, bite-sized version of the beloved pie. But where did this trend begin?
The Origins of Key Lime Flavor
Key limes, also known as Mexican limes or West Indian limes, are smaller, tarter, and more aromatic than regular Persian limes. They were introduced to the Florida Keys in the 16th century, where they thrived in the tropical climate. The famous Key Lime Pie emerged in the late 1800s, using simple ingredients like condensed milk (which didn’t require refrigeration) and local key lime juice.
How Key Lime Cookies Became a Trend
While pies require plates and forks, cookies are easy to share, transport, and enjoy on the go. Bakers began experimenting with incorporating key lime flavors into cookies, leading to creations like:
-
Key Lime Shortbread Cookies (buttery with a citrus zing)
-
Cheesecake-Stuffed Key Lime Cookies (a creamy surprise inside)
-
Key Lime Sugar Cookies (rolled in zest-infused sugar)
Social media platforms like Instagram and Pinterest played a huge role in popularizing these cookies, with food bloggers and home bakers showcasing their vibrant green hues and tangy-sweet appeal.
Why People Love Key Lime Cookies
-
Bright, Refreshing Flavor – The tartness of key lime balances the sweetness of the cookie.
-
Versatility – They work as a summer dessert, holiday treat, or year-round indulgence.
-
Fun to Customize – Add white chocolate, coconut, or even a graham cracker crust crumble for extra texture.
Whether you’re a fan of citrus desserts or just looking for a unique cookie recipe, Key Lime Cookies are a must-try!
The Science Behind the Perfect Key Lime Cookie
Baking is a science, and getting Key Lime Cookies just right requires understanding a few key principles.
The Role of Key Lime Zest vs. Juice
-
Zest contains essential oils, which carry the strongest lime flavor. Always zest before juicing the fruit.
-
Juice adds tanginess but also moisture. Too much can make cookies spread too thin or become cakey.
-
Balance is key—this recipe uses both for maximum flavor without compromising texture.
Why Freeze the Cheesecake Filling?
The filling is a mix of cream cheese, sugar, and lime, which can melt quickly in the oven. Freezing it:
-
Prevents leakage during baking.
-
Ensures a creamy, intact center rather than a melted mess.
-
Vegan cream cheese may need longer freezing time since it’s softer.
The Importance of Proper Flour Measurement
Too much flour = dry, crumbly cookies. Too little = flat, greasy cookies.
-
Best method: Use a kitchen scale (2¾ cups = 344g).
-
No scale? Spoon flour into the measuring cup and level it off (don’t pack it down).
Butter Temperature Matters
-
Too soft: Cookies spread too much.
-
Too cold: Dough won’t cream properly.
-
Ideal texture: Press your finger into the butter—it should leave an indent but still hold its shape.
By mastering these details, you’ll achieve perfectly balanced Key Lime Cookies every time!
Serving and Storing Key Lime Cookies for Maximum Freshness
You’ve baked the perfect batch—now how do you keep them delicious?
Serving Suggestions
-
Warm with Ice Cream: Serve slightly warmed cookies with vanilla or coconut ice cream for a decadent dessert.
-
Dipped in Chocolate: Melt white or dark chocolate and dip half of each cookie for extra richness.
-
Garnish with Zest: A sprinkle of fresh lime zest before serving enhances aroma and flavor.
Storage Tips
-
Room Temperature: Keep in an airtight container for 1-2 days (if they last that long!).
-
Refrigerator: Store for 3-4 days—the cheesecake filling stays fresher chilled.
-
Freezing:
-
Unbaked Dough: Freeze shaped dough balls for up to 3 months. Bake straight from frozen (+1-2 extra minutes).
-
Baked Cookies: Freeze in a single layer, then transfer to a bag. Thaw in the fridge before eating.
-
Reviving Stale Cookies
If cookies lose their softness:
-
Microwave for 5-10 seconds to soften.
-
Place a slice of bread in the container—it’ll transfer moisture to the cookies.
With these tips, your Key Lime Cookies will stay fresh and flavorful—whether you’re enjoying them now or saving some for later!
Expert Tips for the Best Key Lime Cookies
✔ Use Fresh Key Limes – Bottled juice works, but fresh zest and juice provide the best flavor.
✔ Measure Flour Correctly – Too much flour leads to dry cookies. Use a kitchen scale or the scoop-and-level method.
✔ Chill the Dough – If the dough feels too soft, refrigerate for 20-30 minutes before shaping.
✔ Don’t Overbake – The cookies will continue to firm up as they cool.
Storage & Freezing Instructions
Storing Fresh Key Lime Cookies
-
Room Temperature: Keep in an airtight container for 1-2 days.
-
Refrigerator: Store for 3-4 days to maintain freshness.
Freezing for Later
-
Unbaked Dough: Freeze shaped dough balls for up to 3 months. Bake straight from frozen, adding 1-2 extra minutes.
-
Baked Cookies: Freeze in a ziplock bag for 2-3 months. Thaw in the fridge before serving.
Variations & Substitutions
1. Gluten-Free Key Lime Cookies
-
Replace all-purpose flour with gluten-free 1:1 baking flour.
2. Vegan Key Lime Cookies
-
Use vegan butter, flax egg (1 Tbsp flax + 3 Tbsp water), and vegan cream cheese.
3. Key Lime Coconut Cookies
-
Add ½ cup shredded coconut to the dough for a tropical twist.
4. White Chocolate Drizzle
-
Melt white chocolate and drizzle over cooled cookies for extra sweetness.
Frequently Asked Questions (FAQs)
Q: Can I use regular limes instead of key limes?
A: Yes! Regular limes work, but key limes have a more intense, floral tartness.
Q: Why is my filling leaking out?
A: Ensure the filling is fully frozen before baking, and seal the dough tightly.
Q: Can I make these without the cheesecake filling?
A: Absolutely! Just add extra lime zest and juice to the dough for a simpler version.
Q: How do I prevent dry cookies?
A: Measure flour accurately and avoid overbaking.
The Ultimate Guide to Key Lime Cookies: A Zesty, Buttery Delight
When I first visited Florida, I tasted a tiny, tangy cookie that made me smile with every bite. These Key Lime Cookies bring back that burst of sunshine—light, buttery, and kissed with citrus. Whether for an afternoon tea or a sweet gift, they’ll brighten any day.
Ingredients
-
1/2 cup unsalted butter, softened
-
1/2 cup granulated sugar
-
1 egg yolk
-
Zest of 2 key limes (or 1 regular lime)
-
2 tbsp key lime juice
-
1/2 tsp vanilla extract
-
1 1/4 cups all-purpose flour
-
1/4 tsp baking soda
-
Pinch of salt
-
Optional: powdered sugar for dusting
Instructions
-
Preheat oven to 350°F (175°C). Line a baking sheet with parchment paper.
-
Cream butter and sugar until light and fluffy.
-
Mix in egg yolk, lime zest, lime juice, and vanilla.
-
In a separate bowl, whisk flour, baking soda, and salt. Gradually mix into wet ingredients until dough forms.
-
Scoop dough into small balls and place on the baking sheet about 2 inches apart.
-
Bake for 10–12 minutes, until edges are just lightly golden.
-
Cool on a rack and dust with powdered sugar if desired.
Notes
-
Chill dough for 20 minutes if it feels too soft.
-
Add white chocolate chips for a sweet twist.
-
Store in an airtight container up to 1 week (if they last that long!).
Nutrition
- Calories: 95 kcal per cookie
- Sugar: 6g
- Fat: 5g
- Carbohydrates: 11g
- Protein: 1g
Final Thoughts: Why These Key Lime Cookies Are a Must-Try
These Key Lime Cookies are the perfect balance of tangy, sweet, and buttery—just like a mini key lime pie in cookie form! Whether you’re serving them at a party, gifting them to friends, or just treating yourself, they’re guaranteed to be a hit.