
The Ultimate Crispy Chicken Sandwich Recipe – Better Than Fast Food!
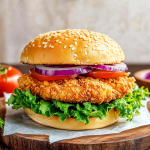
If you’re craving a Crispy Chicken Sandwich that’s juicier, crispier, and more flavorful than anything from a drive-thru, this recipe is for you! With a perfectly seasoned, golden-brown crust and a tangy homemade honey mustard sauce, this sandwich is a game-changer. Plus, it’s surprisingly easy to make at home in just 15 minutes!
Why You’ll Love This Crispy Chicken Sandwich
✔ Extra crispy thanks to a double coating of panko breadcrumbs
✔ Juicy and tender chicken breast that’s never dry
✔ Homemade honey mustard sauce that’s sweet, tangy, and slightly spicy
✔ Quick & easy—ready in just 15 minutes!
✔ Better than fast food—no mystery ingredients, just real, delicious flavors
This Crispy Chicken Sandwich is perfect for weeknight dinners, weekend lunches, or even meal prep (just store the components separately). Let’s dive into the recipe!
Ingredients for the Best Crispy Chicken Sandwich
For the Crispy Chicken:
- 4 boneless, skinless chicken breasts (use small breasts or cut large ones in half lengthwise)
- ¾ cup panko breadcrumbs (for maximum crunch!)
- ¾ cup all-purpose flour (for dredging)
- 2 large eggs (lightly beaten)
- ½ teaspoon paprika (adds smoky depth)
- ½ teaspoon garlic powder (for savory flavor)
- ½ teaspoon onion powder (enhances umami taste)
- Salt & black pepper (to taste)
- Vegetable oil (for frying—about ¼ inch deep in the pan)
For the Honey Mustard Sauce:
- ½ cup Dijon mustard (tangy base)
- 6 tablespoons honey (balances the mustard)
- ½ cup mayonnaise (creamy texture)
- 2 teaspoons fresh lemon juice (brightens the flavor)
- ¼ teaspoon cayenne pepper (optional, for a little heat)
- ½ teaspoon garlic powder (enhances savoriness)
- ¼ teaspoon paprika (or smoked paprika) (adds depth)
- 1 teaspoon white wine vinegar (or apple cider vinegar) (for acidity)
- Salt & black pepper (to taste)
For Assembling the Sandwich:
- 4 brioche buns (or your favorite sandwich rolls)
- Lettuce, tomato, pickles (optional, for freshness)
- Cheese (optional) (American, cheddar, or pepper jack work great)
Step-by-Step Instructions for the Perfect Crispy Chicken Sandwich
1. Make the Honey Mustard Sauce
In a small bowl, whisk together:
- Dijon mustard
- Honey
- Mayonnaise
- Lemon juice
- Cayenne
- Garlic powder
- Paprika
- Vinegar
- Salt & pepper
Cover and refrigerate until ready to use. (This sauce can be made ahead of time—it gets even better as the flavors meld!)
2. Prepare the Chicken
- Pound the chicken breasts to an even ¼-inch thickness (this ensures even cooking).
- Season both sides generously with salt and pepper.
3. Set Up Your Breading Station
You’ll need three shallow bowls:
- Flour (for the first coating)
- Beaten eggs (helps the breadcrumbs stick)
- Panko breadcrumbs mixed with paprika, garlic powder, and onion powder (for extra flavor and crunch)
4. Bread the Chicken
- Dredge each chicken breast in flour (shake off excess).
- Dip into the beaten eggs.
- Coat thoroughly with the seasoned panko mixture.
5. Fry to Crispy Perfection
- Heat ¼ inch of vegetable oil in a large skillet over medium-high heat (350°F).
- Once hot, carefully add the chicken (don’t overcrowd—cook in batches if needed).
- Fry for 3-4 minutes per side until golden brown and crispy.
- Transfer to a paper towel-lined plate or cooling rack to drain excess oil.
6. Assemble Your Crispy Chicken Sandwich
- Lightly toast the buns (optional but recommended).
- Spread honey mustard sauce on both sides.
- Add the crispy chicken.
- Top with lettuce, tomato, pickles, or cheese (if using).
- Serve immediately while hot and crispy!
The Secret to Perfectly Crispy Chicken Coating
Achieving the perfect crispy coating for your chicken sandwich is both an art and a science. The difference between a soggy, disappointing sandwich and a crunchy, golden-brown masterpiece comes down to three key factors: breading technique, oil temperature, and proper seasoning.
Why Panko Breadcrumbs Are Essential
The foundation of any great Crispy Chicken Sandwich starts with the right breading. While regular breadcrumbs work, panko breadcrumbs are the secret weapon for maximum crunch. Here’s why:
✔ Larger, flakier texture – Creates a lighter, airier crust that stays crispy longer.
✔ Less oil absorption – Unlike fine breadcrumbs, panko doesn’t get soggy as quickly.
✔ Better browning – The irregular shape allows for more surface area to crisp up.
How to Season Your Breading for Maximum Flavor
Plain panko is fine, but seasoned panko takes your sandwich to the next level. For the best results, mix:
- ½ teaspoon paprika (adds smoky depth)
- ½ teaspoon garlic powder (boosts savoriness)
- ½ teaspoon onion powder (enhances umami flavor)
- Salt & black pepper (to taste)
The Triple-Coating Method for Ultimate Crunch
To achieve that thick, shatteringly crisp coating, follow this foolproof breading process:
- Flour Dredge – Helps the egg wash adhere to the chicken.
- Egg Wash – Acts as the “glue” for the breadcrumbs.
- Panko Coating – Press firmly to ensure full coverage.
Pro Tip: Let the breaded chicken rest for 5 minutes before frying to help the coating set.
The Right Oil & Temperature for Frying
Even the best breading can turn out soggy if the oil isn’t hot enough. Here’s how to fry like a pro:
✔ Use a neutral oil – Vegetable, canola, or peanut oil works best.
✔ Maintain 350°F – Too cold = greasy; too hot = burnt outside, raw inside.
✔ Don’t overcrowd the pan – Fry in batches to keep the oil temperature stable.
How to Tell When the Oil is Ready
- Use a thermometer (most accurate method).
- Wooden spoon test – Dip the handle in oil; if bubbles form rapidly, it’s ready.
- Breadcrumb test – Toss a pinch of panko in; if it sizzles immediately, it’s good to go.
Common Mistakes & How to Fix Them
❌ Problem: Breading falls off.
✅ Solution: Pat chicken dry before breading & let it rest before frying.
❌ Problem: Chicken is dry.
✅ Solution: Don’t overcook! 3-4 minutes per side at 350°F is ideal.
❌ Problem: Not crispy enough.
✅ Solution: Double-fry (first at 325°F, rest, then fry again at 375°F).
Alternative Cooking Methods
Air Fryer Option
- Spray breaded chicken with oil.
- Air fry at 400°F for 12-15 minutes, flipping halfway.
Oven-Baked Option
- Place on a wire rack over a baking sheet.
- Bake at 400°F for 20-25 minutes, flipping once.
The Best Homemade Honey Mustard Sauce
A great Crispy Chicken Sandwich isn’t complete without an irresistible sauce. While store-bought versions work in a pinch, homemade honey mustard sauce takes your sandwich to the next level.
Why Homemade Sauce is Better
✔ No preservatives or artificial flavors – Just fresh, real ingredients.
✔ Customizable heat & sweetness – Adjust to your taste.
✔ Creamier texture – No weird separation or gumminess.
Key Ingredients & Their Roles
1. Dijon Mustard (½ cup)
- Adds tangy depth (more complex than yellow mustard).
- Emulsifies the sauce for a smooth texture.
2. Honey (6 tbsp)
- Balances the mustard’s sharpness.
- Tip: Warm honey slightly if too thick.
3. Mayonnaise (½ cup)
- Creates rich creaminess.
- Alternative: Greek yogurt for a lighter version.
4. Lemon Juice (2 tsp)
- Brightens flavors & cuts richness.
5. Spices (Garlic powder, paprika, cayenne)
- ½ tsp garlic powder – Enhances savoriness.
- ¼ tsp paprika – Adds subtle smokiness.
- ¼ tsp cayenne – Optional for heat.
6. Vinegar (1 tsp white wine or apple cider)
- Boosts acidity for a well-rounded flavor.
Step-by-Step Honey Mustard Sauce Recipe
- Whisk together Dijon mustard, honey, and mayo.
- Add lemon juice, vinegar, and spices.
- Season with salt & pepper.
- Refrigerate for 30+ mins (flavors meld better when chilled).
Pro Tip: For a smoky twist, use smoked paprika instead of regular.
Customization Ideas
- Spicier Version – Add hot sauce or extra cayenne.
- Smoky Flavor – Use chipotle powder instead of paprika.
- Herb-Infused – Stir in fresh dill or chives.
Storage & Uses
- Fridge: Keeps for up to 1 week in an airtight container.
- Uses Beyond Sandwiches:
- Salad dressing
- Dip for fries or nuggets
- Glaze for grilled chicken
Common Mistakes & Fixes
❌ Too thick? Thin with a splash of water or lemon juice.
❌ Too sweet? Balance with more mustard or vinegar.
How to Assemble the Ultimate Sandwich
You’ve mastered the crispy chicken and the honey mustard sauce—now it’s time to build the perfect sandwich.
Choosing the Right Bun
The bun can make or break your Crispy Chicken Sandwich. Here’s a breakdown of the best options:
1. Brioche Bun
✔ Buttery, soft, slightly sweet – Complements the savory chicken.
2. Potato Roll
✔ Light, fluffy texture – Classic choice for fried chicken.
3. Ciabatta or Artisan Roll
✔ Chewy crust – Adds great texture contrast.
Pro Tip: Lightly toast the bun to prevent sogginess!
Essential Toppings & Layering Order
- Sauce on Both Sides – Prevents sogginess.
- Crispy Lettuce – Adds fresh crunch.
- Juicy Tomato Slices – Pat dry to avoid excess moisture.
- Pickles – Tangy contrast to rich chicken.
Next-Level Topping Combos
1. Classic Southern Style
- Honey mustard sauce
- Coleslaw
- Pickles
2. Spicy Nashville Hot
- Hot honey drizzle
- Pickles
- Ranch or blue cheese
Assembly Pro Tips
✔ Layer toppings strategically – Lettuce under chicken prevents sogginess.
✔ Let chicken rest 2 mins before assembling – Keeps coating crisp.
Tips for the Best Crispy Chicken Sandwich
✅ Use panko breadcrumbs—they stay crispier than regular breadcrumbs.
✅ Don’t skip pounding the chicken—even thickness = even cooking.
✅ Keep oil at 350°F—too hot = burnt outside, raw inside; too cool = soggy breading.
✅ Double-fry for extra crispiness (like Korean fried chicken!). Fry once, rest, then fry again.
✅ Air fryer option: Spray breaded chicken with oil and air fry at 400°F for 12-15 mins, flipping halfway.
Frequently Asked Questions (FAQs)
1. Can I bake instead of fry?
Yes! Bake at 400°F for 20-25 minutes on a wire rack (spray with oil for crispiness).
2. Can I use chicken thighs?
Absolutely! Thighs are juicier—just adjust cooking time as needed.
3. How do I store leftovers?
Store separately: chicken in an airtight container (reheat in oven/air fryer to keep crispy). Sauce lasts up to 1 week in the fridge.
4. What’s the best bun for a Crispy Chicken Sandwich?
Brioche (buttery & soft), potato rolls (slightly sweet), or ciabatta (chewy texture).
5. Can I make this gluten-free?
Yes! Use gluten-free panko and GF flour.
Nutritional Information (Per Serving)
| Calories | Carbs | Protein | Fat |
|---|---|---|---|
| 721 kcal | 55g | 33g | 42g |
(Note: Condiments & extra toppings not included in nutritional info.)
The Ultimate Crispy Chicken Sandwich Recipe – Better Than Fast Food!
This Crispy Chicken Sandwich is so delicious and easy to make that you’ll never need fast food again! The chicken is perfectly seasoned, extra crispy, and ready in just 15 minutes. Pair it with a tangy honey mustard sauce and your favorite toppings for the ultimate homemade sandwich.
- Prep Time: 5 minutes
- Cook Time: 10 minutes
- Total Time: 15 minutes
Ingredients
For the Crispy Chicken:
- 4 boneless, skinless chicken breasts (use 4 small breasts or cut 2 large ones in half lengthwise)
- ¾ cup panko breadcrumbs
- ¾ cup all-purpose flour
- 2 large eggs, lightly beaten
- ½ teaspoon paprika
- ½ teaspoon garlic powder
- ½ teaspoon onion powder
- Salt & black pepper, to taste
- Vegetable oil, for frying
For the Honey Mustard Sauce:
- ½ cup Dijon mustard
- 6 tablespoons honey
- ½ cup mayonnaise
- 2 teaspoons fresh lemon juice
- ¼ teaspoon cayenne pepper
- ½ teaspoon garlic powder
- ¼ teaspoon paprika (or smoked paprika)
- 1 teaspoon white wine vinegar (or apple cider vinegar)
- Salt & black pepper, to taste
For Assembly:
- 4 burger buns
- Lettuce, tomato, pickles (optional)
Instructions
1. Make the Honey Mustard Sauce
In a small bowl, whisk together all sauce ingredients until smooth. Refrigerate until ready to use.
2. Prepare the Chicken
- Pound the chicken: Place one breast in a zip-top bag and gently pound to an even ¼-inch thickness. Repeat with remaining chicken. Season both sides with salt & pepper.
- Set up breading stations:
- Bowl 1: Flour
- Bowl 2: Beaten eggs
- Bowl 3: Panko mixed with paprika, garlic powder, and onion powder
- Dredge each breast: Coat in flour, dip in egg, then press into panko mixture for full coverage.
3. Fry the Chicken
- Heat ¼-inch of oil in a large skillet over medium-high heat (350°F).
- Fry chicken in batches (don’t overcrowd) for 3-4 minutes per side until golden and crispy.
- Drain on paper towels or a wire rack.
4. Assemble the Sandwiches
- Toast buns lightly if desired.
- Spread honey mustard sauce on both sides.
- Add crispy chicken and top with lettuce, tomato, pickles, or other favorite toppings.
Notes
✔ Even thickness ensures even cooking—don’t skip pounding the chicken!
✔ Hot oil is key for crispiness. Test with a breadcrumb—it should sizzle immediately.
✔ Double breading (flour → egg → panko) gives the crispiest coating.
✔ Air fryer option: Spray breaded chicken with oil and air fry at 400°F for 10-12 minutes, flipping halfway.
Nutrition
- Calories: 721kcal per serving
- Sugar: 28g
- Sodium: 778mg
- Fat: 42g
- Saturated Fat: 16g
- Carbohydrates: 55g
- Fiber: 3g
- Protein: 33g
Final Thoughts
This Crispy Chicken Sandwich is restaurant-quality but made easily at home. The crunchy panko coating, juicy chicken, and tangy honey mustard sauce make it irresistible. Skip the fast-food line—this sandwich is faster, tastier, and healthier!