
No-Bake Strawberry Cheesecake Jars: The Perfect Summer Dessert
If you’re looking for a refreshing, easy-to-make dessert that’s perfect for warm weather, these No-Bake Strawberry Cheesecake Jars are the answer! This delightful treat combines creamy cheesecake, buttery vanilla wafer crumbs, and juicy strawberries in convenient, portable mason jars. Whether you’re hosting a summer picnic, a backyard BBQ, or just craving a sweet indulgence, this recipe is a must-try.
In this comprehensive guide, we’ll cover everything you need to know about making No-Bake Strawberry Cheesecake Jars, including:
- Why You’ll Love This Recipe
- Step-by-Step Instructions
- Ingredient Substitutions & Variations
- Storage Tips & Make-Ahead Options
- Nutritional Information
- Frequently Asked Questions
By the end of this post, you’ll be ready to whip up these delicious No-Bake Strawberry Cheesecake Jars like a pro!
Why You’ll Love No-Bake Strawberry Cheesecake Jars
1. No Oven Required
One of the best things about this dessert is that it’s completely no-bake, meaning you don’t have to turn on your oven in the middle of summer. The crust sets in the fridge, and the cheesecake filling firms up beautifully without any baking.
2. Individual Portions for Easy Serving
These cheesecake jars are perfectly portioned, making them ideal for parties, potlucks, or meal prep. Plus, the mason jars keep everything neat and portable—no messy plates or forks required!
3. Lightened-Up but Still Indulgent
By using reduced-fat cream cheese, Greek yogurt, and a moderate amount of sugar, this recipe offers a lighter twist on traditional cheesecake without sacrificing flavor.
4. Customizable & Versatile
You can easily swap out ingredients to fit dietary preferences (gluten-free, vegan, etc.) or experiment with different fruits like blueberries, raspberries, or peaches.
5. Perfect for Any Occasion
Whether it’s a summer cookout, a bridal shower, or a simple weeknight treat, these No-Bake Strawberry Cheesecake Jars are always a hit!
Ingredients for No-Bake Strawberry Cheesecake Jars
Here’s what you’ll need to make this delicious dessert:
For the Crust:
- 8 oz high-quality vanilla wafers (or gluten-free alternative)
- 3 tbsp unsalted butter, melted
For the Cheesecake Filling:
- 8 oz reduced-fat cream cheese, softened
- ½ cup plain Greek yogurt (about 5.3 oz)
- ¼ cup granulated sugar (or substitute with honey/maple syrup)
- ½ tsp vanilla extract
- Zest of 1 lemon
- 1 tsp lemon juice
- 1 ½ cups whipped topping (like Truwhip or homemade whipped cream)
For the Strawberry Layers:
- 4 cups hulled and quartered strawberries, divided
Equipment Needed:
- Food processor
- Hand mixer
- Mixing bowls
- 8-ounce mason jars with lids
Step-by-Step Instructions
Step 1: Prepare the Crust
- Process the vanilla wafers in a food processor until fine crumbs form.
- Add melted butter and pulse for 3-5 seconds until the mixture is clumpy.
- Press 2 tbsp of crumbs into the bottom of each mason jar, using a spoon to compact slightly.
- Refrigerate jars while preparing the filling to firm up the crust.
Step 2: Make the Cheesecake Filling
- In a large bowl, beat cream cheese, Greek yogurt, and sugar with a hand mixer until smooth.
- Add vanilla, lemon zest, and lemon juice, mixing for another 30 seconds.
- Gently fold in whipped topping and 1 cup of strawberries until fully combined.
Step 3: Layer the Cheesecake Jars
- Remove jars from the fridge and spoon 2-3 tbsp of cheesecake filling into each.
- Add a layer of strawberries (about 2-3 tbsp).
- Top with remaining cheesecake filling and finish with more strawberries.
- Seal with lids and refrigerate for 1-2 hours (or overnight) before serving.
The Perfect Crust for No-Bake Strawberry Cheesecake Jars
One of the most important elements of No-Bake Strawberry Cheesecake Jars is the crust. A well-made crust provides texture, flavor, and structure to the dessert. Unlike traditional cheesecakes that require baking, this version uses a simple no-bake crust made from vanilla wafers and butter. Here’s everything you need to know to create the perfect base for your cheesecake jars.
Choosing the Right Cookies
The classic choice for this recipe is vanilla wafers, which offer a sweet, slightly buttery flavor that pairs beautifully with the creamy cheesecake filling and fresh strawberries. However, you can experiment with different types of cookies depending on your preferences:
- Graham crackers – A traditional cheesecake crust option with a slightly honeyed taste.
- Shortbread cookies – Adds a rich, buttery flavor.
- Gluten-free cookies – For those with dietary restrictions, gluten-free vanilla or almond cookies work well.
- Chocolate cookies – For a decadent twist, try using Oreo crumbs (with or without the filling).
How to Achieve the Right Texture
The key to a great no-bake crust is the crumb consistency. You want fine, even crumbs that hold together when pressed. Here’s how to get it right:
- Use a food processor – Pulse the cookies until they resemble fine sand. If you don’t have a food processor, place them in a zip-top bag and crush them with a rolling pin.
- Mix with melted butter – The butter acts as a binder, helping the crust firm up in the fridge. For every 1 cup of crumbs, use about 1-2 tablespoons of melted butter.
- Press firmly – Use the back of a spoon or a small measuring cup to compact the crumbs at the bottom of each jar. This prevents the crust from crumbling when eaten.
Flavor Variations for the Crust
While vanilla wafers are delicious on their own, you can enhance the crust with additional flavors:
- Add cinnamon or nutmeg – A pinch of spice can add warmth.
- Mix in toasted nuts – Finely chopped almonds or pecans add crunch.
- Use brown butter – Browning the butter before mixing gives a nutty, caramelized depth.
Common Mistakes to Avoid
- Too much butter – This can make the crust greasy instead of crisp.
- Not pressing firmly enough – A loose crust will fall apart when layered with filling.
- Using stale cookies – Fresh, crisp cookies yield the best texture.
By perfecting your crust, you ensure that every bite of your No-Bake Strawberry Cheesecake Jars has the ideal balance of crunch and creaminess.
Mastering the Creamy Cheesecake Filling
The heart of No-Bake Strawberry Cheesecake Jars is the luscious, creamy filling. Unlike baked cheesecakes, which rely on eggs for structure, this version gets its lightness from whipped topping and Greek yogurt. Here’s how to make it perfectly smooth and flavorful every time.
Key Ingredients & Their Roles
- Cream Cheese – The base of the filling. Use full-fat for richness or reduced-fat for a lighter option. Ensure it’s softened to room temperature for smooth blending.
- Greek Yogurt – Adds tanginess and a protein boost while keeping the texture light. Use plain, unsweetened yogurt to control sweetness.
- Whipped Topping – Stabilizes the filling and adds airiness. Truwhip or homemade whipped cream works best.
- Lemon Zest & Juice – Brightens the flavor and balances sweetness.
Step-by-Step Filling Technique
- Beat cream cheese until smooth – Any lumps will affect the final texture.
- Add yogurt & sugar gradually – This prevents graininess.
- Incorporate lemon & vanilla – Enhances depth of flavor.
- Fold in whipped topping gently – Overmixing can deflate the mixture.
Troubleshooting Common Issues
- Runny filling? – Chill the mixture for 20 minutes before layering.
- Too thick? – Add a splash of milk or extra yogurt.
- Not sweet enough? – Adjust sugar to taste or drizzle honey between layers.
Flavor Variations
- Chocolate Cheesecake – Add cocoa powder.
- Lemon Blueberry – Swap strawberries for blueberries and add extra lemon zest.
- Pumpkin Spice – Mix in pumpkin puree and cinnamon for a fall twist.
A perfectly made filling should be silky, lightly sweet, and hold its shape when layered.
Strawberry Selection & Layering Tips
Fresh strawberries are the star of No-Bake Strawberry Cheesecake Jars, providing juicy bursts of flavor. Here’s how to prepare and layer them for maximum impact.
Choosing the Best Strawberries
- Look for bright red color – Avoid white or green tops.
- Check for firmness – Soft spots indicate overripeness.
- Smell them! – Ripe strawberries have a sweet, fragrant aroma.
Prepping the Strawberries
- Hull them properly – Use a paring knife to remove stems and cores.
- Slice uniformly – Quartered berries distribute evenly.
- Macerate (optional) – Toss with a bit of sugar and let sit for 10 minutes to enhance juiciness.
Layering for Visual Appeal & Texture
- Bottom layer – Crust for crunch.
- Middle layer – Cheesecake filling + strawberries.
- Top layer – Extra berries for freshness.
- Garnish – Mint leaves or a dusting of powdered sugar.
Alternative Fruit Options
- Mixed berries – Raspberries + blackberries.
- Tropical – Mango or kiwi.
- Seasonal – Peaches in summer, pomegranate in winter.
Storage Tips for Freshness
- Keep jars airtight – Prevents berries from drying out.
- Add berries before serving – If making ahead, store filling separately to avoid sogginess.
With these tips, your No-Bake Strawberry Cheesecake Jars will be as beautiful as they are delicious!
Tips for the Best No-Bake Strawberry Cheesecake Jars
✅ Use cold ingredients – Ensure Greek yogurt and whipped topping are chilled to prevent a runny texture.
✅ Drain excess liquid from yogurt – If your Greek yogurt is watery, strain it first.
✅ Customize the sweetness – Adjust sugar to taste or use natural sweeteners like honey.
✅ Try different fruits – Blueberries, raspberries, or mangoes work great too!
✅ Make it gluten-free – Swap vanilla wafers for gluten-free cookies.
How to Store & Serve
- Refrigerator: Store covered for up to 5 days.
- Freezing: Not recommended, as the texture may change.
- Serving: Enjoy chilled straight from the fridge!
Nutritional Information (Per Serving)
| Calories | Carbs | Protein | Fat | Sugar |
|---|---|---|---|---|
| 323 kcal | 37g | 3g | 17g | 24g |
Frequently Asked Questions
1. Can I use full-fat cream cheese?
Yes! Full-fat cream cheese will make the filling richer.
2. Can I make this dairy-free?
Absolutely! Use dairy-free cream cheese, coconut yogurt, and coconut whipped cream.
3. How long do these last in the fridge?
Up to 5 days when properly sealed.
4. Can I use frozen strawberries?
Fresh is best, but thawed & drained frozen strawberries can work in a pinch.
No-Bake Strawberry Cheesecake Jars: The Perfect Summer Dessert
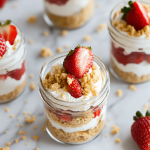
These No-Bake Strawberry Cheesecake Jars are the perfect summer dessert! Each jar features layers of creamy, lightened-up cheesecake, crunchy vanilla wafer crumbs, fresh strawberries, and a hint of lemon for a refreshing twist. Easy to make and perfect for picnics, parties, or a sweet treat at home—no oven required!
- Prep Time: 30 minutes
- Total Time: 2 hours 30 minutes
Ingredients
For the Crust:
- 8 oz (about 2 cups) vanilla wafers (or gluten-free alternative)
- 3 tbsp unsalted butter, melted
For the Cheesecake Filling:
- 8 oz reduced-fat cream cheese, softened
- ½ cup (5.3 oz) plain Greek yogurt (cold)
- ¼ cup granulated sugar
- ½ tsp vanilla extract
- Zest of 1 lemon
- 1 tsp lemon juice
- 1½ cups whipped topping (like Truwhip or Cool Whip)
For the Strawberry Layers:
- 4 cups fresh strawberries, hulled & quartered (divided)
Equipment Needed:
- Food processor
- Hand mixer
- Mixing bowls
- 8 (8-oz) mason jars with lids
Instructions
- Prepare the Crust:
- Crush vanilla wafers in a food processor into fine crumbs.
- Add melted butter and pulse until the mixture clumps together.
- Press 2 tbsp crumbs into the bottom of each jar, packing lightly. Refrigerate while making the filling.
- Make the Cheesecake Filling:
- In a large bowl, beat cream cheese, Greek yogurt, and sugar until smooth.
- Mix in vanilla, lemon zest, and lemon juice.
- Gently fold in whipped topping and 1 cup strawberries.
- Layer the Jars:
- Remove jars from the fridge.
- Add 2-3 tbsp cheesecake filling to each jar.
- Layer 2-3 tbsp strawberries on top.
- Repeat with remaining filling and strawberries.
- Chill & Serve:
- Seal jars and refrigerate for 1-2 hours (or overnight).
- Serve cold and enjoy!
Notes
✔ Keep ingredients cold—Greek yogurt and whipped topping should be chilled to prevent a runny texture.
✔ Drain Greek yogurt if watery to avoid excess liquid.
✔ Gluten-free option: Swap vanilla wafers for gluten-free cookies.
✔ Storage: Keeps well in the fridge for up to 5 days.
Nutrition
- Calories: 323 kcal per serving
- Sugar: 24g
- Fat: 17g
- Carbohydrates: 37g
- Fiber: 2g
- Protein: 3g
Final Thoughts
These No-Bake Strawberry Cheesecake Jars are a simple, delicious, and portable dessert that’s perfect for summer. With layers of creamy cheesecake, crunchy crust, and fresh strawberries, they’re sure to be a crowd-pleaser. Plus, since they’re no-bake, you can enjoy a sweet treat without heating up the kitchen!