Disneyland Peanut Butter Squares: A Magical Treat You Can Make at Home
If you’ve ever visited Disneyland, you know that the magic isn’t just in the rides and characters—it’s also in the food! One of the most beloved treats from the park is the Disneyland Peanut Butter Squares. These decadent, peanut butter and chocolate delights are a fan favorite, and now you can bring a piece of the Magic Kingdom into your own kitchen with this easy-to-follow recipe. Whether you’re a Disney enthusiast or just a lover of sweet treats, these peanut butter squares are sure to become a staple in your dessert repertoire.
In this post, we’ll walk you through everything you need to know to make these iconic Disneyland Peanut Butter Squares, from the ingredients and step-by-step instructions to tips and tricks for perfecting the recipe. Plus, we’ll dive into why this treat is so special and how you can customize it to make it your own. Let’s get started!
Why Disneyland Peanut Butter Squares Are So Special
Disneyland is known for its attention to detail, and that extends to its food. The Disneyland Peanut Butter Squares are no exception. These squares are a perfect balance of creamy peanut butter, rich chocolate, and a hint of graham cracker crunch. They’re not overly sweet, making them a crowd-pleaser for both kids and adults.
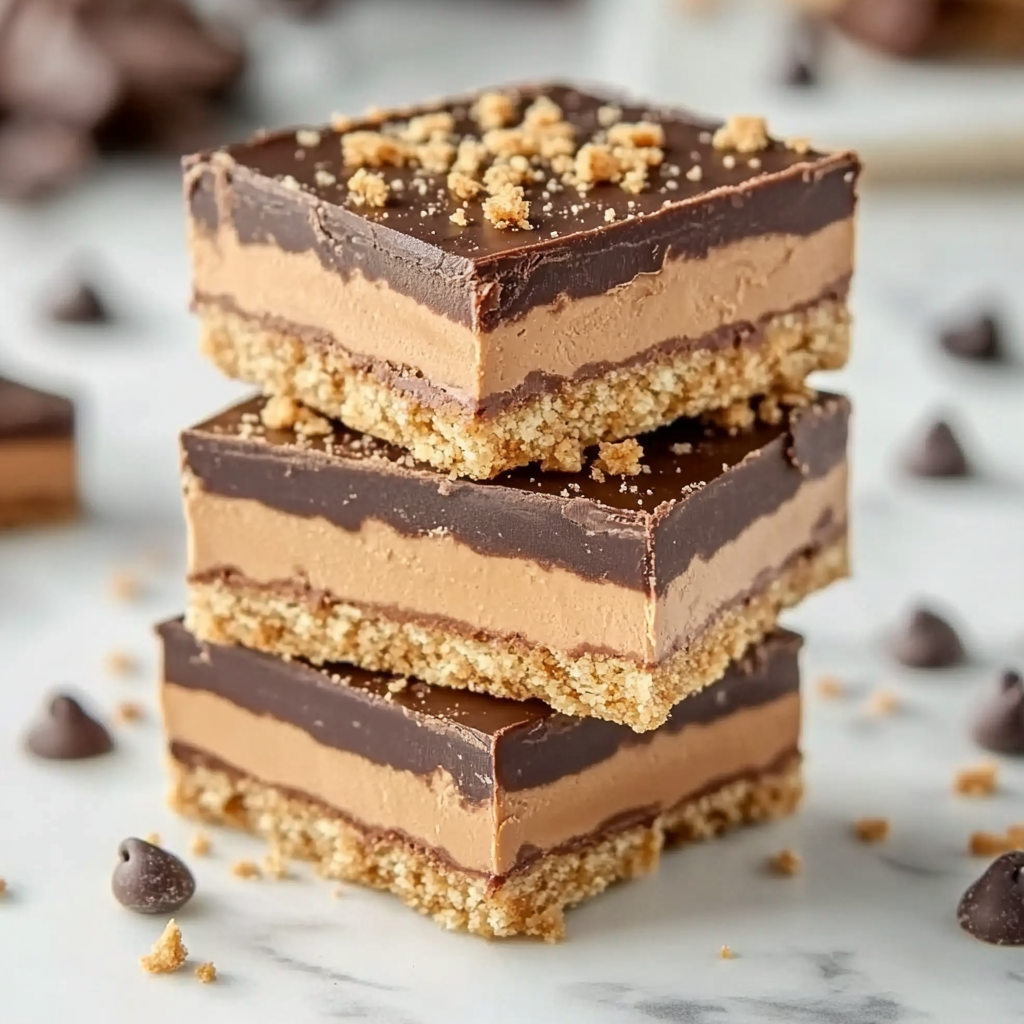
What makes these squares stand out is their texture. The layers of graham crackers, peanut butter, and chocolate create a harmonious blend of soft, chewy, and crunchy elements. Plus, the addition of shortening to the chocolate ensures a smooth, glossy finish that’s both visually appealing and delicious.
Ingredients for Disneyland Peanut Butter Squares
Before we dive into the instructions, let’s take a look at the ingredients you’ll need to make these magical treats. The recipe is simple and uses pantry staples, so you likely already have most of these items on hand.
Ingredients:
- 14 whole graham cracker sheets (divided into 6, 6, and 2 sheets)
- 2 cups creamy peanut butter (use a high-quality brand for the best flavor)
- 8 tablespoons butter (softened)
- 2 teaspoons vanilla extract
- ½ teaspoon salt
- 3½ cups powdered sugar
- 4 tablespoons shortening (this is key for the chocolate layer)
- 4 cups semi-sweet chocolate chips
Step-by-Step Instructions for Making Disneyland Peanut Butter Squares
Now that you’ve gathered your ingredients, it’s time to start baking! Follow these steps to create your own batch of Disneyland Peanut Butter Squares.
Step 1: Prepare the Baking Dish
- Spray a 9×13-inch glass baking dish with non-stick spray. Alternatively, you can line it with parchment paper for easy removal.
Step 2: Crush the Graham Crackers
- Place 2 whole graham cracker sheets in a Ziploc bag and crush them into fine crumbs using a meat mallet or the bottom of a glass. Set these aside for the topping.
Step 3: Make the Peanut Butter Filling
- In a large mixing bowl, combine the creamy peanut butter, softened butter, vanilla extract, and salt. Mix until smooth.
- Gradually add the powdered sugar, a little at a time, until the mixture is thick and dough-like. You may need to use your hands to fully incorporate the powdered sugar.
Step 4: Melt the Chocolate
- In a microwave-safe bowl, combine the semi-sweet chocolate chips and shortening. Microwave in 30-second intervals, stirring between each interval, until the chocolate is smooth and fully melted. Be careful not to overheat the chocolate, as it can seize and become grainy.
Step 5: Assemble the Layers
- First Layer: Place 6 whole graham cracker sheets in the bottom of the prepared baking dish.
- Second Layer: Pour about ⅓ of the melted chocolate over the graham crackers, spreading it into a thin, even layer.
- Third Layer: Take handfuls of the peanut butter mixture and flatten them into discs. Lay these on top of the chocolate layer, covering as much surface area as possible without breaking the graham crackers below.
- Fourth Layer: Pour another ⅓ of the melted chocolate over the peanut butter layer, spreading it evenly.
- Fifth Layer: Add the remaining 6 graham cracker sheets on top of the chocolate.
- Final Layer: Pour the remaining melted chocolate over the top and sprinkle with the crushed graham cracker crumbs.
Step 6: Chill and Serve
- Place the baking dish in the refrigerator and let it chill for at least 1 hour, or until the chocolate is fully set.
- Once set, remove the dish from the fridge and cut the squares into your desired size. For a true Disneyland experience, aim for 24 squares.
The History of Disneyland Peanut Butter Squares
The Disneyland Peanut Butter Squares have become a legendary treat among park-goers, but where did they originate? While the exact history of this dessert is a bit of a mystery, it’s widely believed that these squares were first introduced in the early days of Disneyland as part of the park’s effort to create unique and memorable snacks. Disneyland has always been known for its innovative food offerings, from the iconic Dole Whip to the famous churros, and the Peanut Butter Squares are no exception.
These squares quickly gained a cult following due to their perfect balance of flavors and textures. The combination of creamy peanut butter, rich chocolate, and crunchy graham crackers was an instant hit, and they became a staple in the park’s dessert lineup. Over the years, fans have tried to replicate the recipe at home, with varying degrees of success. The version we’re sharing today is as close to the original as you can get without stepping foot in the park.
What makes these squares so special is their simplicity. Unlike many modern desserts that rely on elaborate techniques or exotic ingredients, the Disneyland Peanut Butter Squares are made with basic, pantry-friendly items. This simplicity is part of their charm—they’re a nostalgic treat that reminds us of childhood and the magic of Disney. Whether you’re enjoying them at the park or making them at home, these squares are a delicious way to connect with the Disney experience.
Tips for Perfecting Your Disneyland Peanut Butter Squares
Making Disneyland Peanut Butter Squares at home is easier than you might think, but there are a few tips and tricks that can help you achieve the perfect result. First and foremost, it’s important to use high-quality ingredients. Since this recipe relies on simple components like peanut butter and chocolate, using premium brands will make a noticeable difference in the final product. Look for creamy peanut butter without added sugars or oils, and opt for semi-sweet chocolate chips that melt smoothly.
Another key tip is to be patient when melting the chocolate. Overheating can cause the chocolate to seize, resulting in a grainy texture. To avoid this, melt the chocolate in short intervals in the microwave, stirring between each interval. Adding shortening to the chocolate is also crucial—it helps the chocolate melt more evenly and gives it a glossy finish that’s reminiscent of the Disneyland version.
When assembling the layers, take your time to ensure each layer is even and well-distributed. The graham cracker base should be firmly pressed into the baking dish, and the peanut butter layer should be spread as evenly as possible. If you’re having trouble spreading the chocolate, try using a piping bag or a Ziploc bag with the corner cut off to create a more controlled application.
Finally, don’t skip the chilling step. Allowing the squares to set in the refrigerator for at least an hour ensures that they hold their shape and makes them easier to cut. For an extra touch of magic, consider adding a sprinkle of sea salt or a drizzle of melted white chocolate on top before serving.
Customizing Your Disneyland Peanut Butter Squares
One of the best things about the Disneyland Peanut Butter Squares recipe is its versatility. While the classic version is undeniably delicious, there are plenty of ways to customize the squares to suit your taste preferences or dietary needs. For example, if you’re a fan of crunchy peanut butter, you can use that instead of creamy for an added texture. Similarly, if you prefer a darker chocolate, you can swap out the semi-sweet chocolate chips for dark chocolate chips.
For those with dietary restrictions, there are also easy substitutions you can make. If you’re gluten-free, simply use gluten-free graham crackers to create a version that’s safe for those with gluten sensitivities. You can also experiment with alternative sweeteners, such as coconut sugar or maple syrup, to reduce the refined sugar content. Just keep in mind that these substitutions may alter the texture and flavor slightly.
If you’re feeling adventurous, you can add extra layers or toppings to make the squares even more indulgent. A layer of caramel or marshmallow fluff between the peanut butter and chocolate would add a delightful twist. You could also sprinkle crushed nuts, toffee bits, or even mini chocolate chips on top for added crunch and flavor.
Nutritional Information
While these Disneyland Peanut Butter Squares are undeniably indulgent, it’s always good to know what you’re enjoying. Here’s a breakdown of the nutritional information per serving (based on 24 squares):
- Calories: 457kcal
- Carbohydrates: 44g
- Protein: 8g
- Fat: 29g
- Saturated Fat: 12g
- Cholesterol: 12mg
- Sodium: 238mg
- Potassium: 324mg
- Fiber: 4g
- Sugar: 32g
- Vitamin A: 133IU
- Calcium: 35mg
- Iron: 3mg
Why You’ll Love This Recipe
This Disneyland Peanut Butter Squares recipe is more than just a dessert—it’s a way to bring a little bit of Disney magic into your home. Whether you’re making these for a party, a family treat, or just because, they’re sure to impress. The combination of creamy peanut butter, rich chocolate, and crunchy graham crackers is irresistible, and the recipe is easy enough for bakers of all skill levels.
So, what are you waiting for? Gather your ingredients, put on your favorite Disney playlist, and start baking! These Disneyland Peanut Butter Squares are the perfect way to satisfy your sweet tooth and transport yourself to the happiest place on earth—even if it’s just in your kitchen.
Disneyland Peanut Butter Squares: A Magical Treat You Can Make at Home

Bring a touch of Disney magic into your kitchen with these homemade Disneyland Peanut Butter Squares! This delightful treat combines creamy peanut butter, rich chocolate, and crunchy graham crackers to create a dessert that’s both nostalgic and irresistible. Perfect for parties, snacks, or a sweet indulgence, these squares are sure to be a hit with kids and adults alike. Follow the simple steps below to recreate this iconic Disney treat at home.
- Prep Time: 15 minutes
- Cook Time: 1 hour
- Total Time: 1 hour 15 minutes
Ingredients
- 14 whole graham cracker sheets
- 2 cups creamy peanut butter
- 8 tablespoons butter, softened
- 2 teaspoons vanilla extract
- ½ teaspoon salt
- 3½ cups powdered sugar
- 4 tablespoons shortening
- 4 cups semi-sweet chocolate chips
Instructions
- Prepare the Baking Dish:
Spray a 9×13-inch glass baking dish with non-stick spray. Alternatively, line it with parchment paper for easy removal. - Make Graham Cracker Crumbs:
Place 2 whole graham cracker sheets in a Ziploc bag and crush them into fine crumbs using a meat mallet or the bottom of a glass. Set aside for the topping. - Prepare the Peanut Butter Filling:
In a large bowl, mix the peanut butter, softened butter, vanilla, and salt until smooth. Gradually add the powdered sugar, mixing until fully incorporated. The mixture will be thick and dough-like. - Melt the Chocolate:
In a microwave-safe bowl, combine the chocolate chips and shortening. Microwave in 30-second intervals, stirring between each, until the chocolate is smooth and fully melted. Be careful not to overheat. - Assemble the Layers:
- Layer 6 whole graham cracker sheets on the bottom of the prepared baking dish.
- Pour about ⅓ of the melted chocolate over the graham crackers, spreading it into a thin, even layer.
- Take handfuls of the peanut butter mixture, flatten them, and layer them over the chocolate. Cover as much as possible without breaking the graham crackers underneath.
- Pour another ⅓ of the melted chocolate over the peanut butter layer.
- Add the remaining 6 graham cracker sheets on top.
- Finish with the remaining melted chocolate, spreading it evenly.
- Add the Topping:
Sprinkle the reserved graham cracker crumbs over the top of the chocolate layer. - Chill and Set:
Refrigerate the dish for at least 1 hour, or until the chocolate is fully set. - Cut and Serve:
Once chilled, cut into squares of your desired size. Serve and enjoy!
Notes
- Non-Stick Spray vs. Parchment Paper: If you don’t have non-stick spray, parchment paper works perfectly and makes it easier to lift the squares out of the dish.
- Don’t Skip the Shortening: The shortening helps the chocolate melt smoothly and makes it easier to spread.
- Piping Chocolate: If spreading the chocolate is tricky, transfer it to a Ziploc bag, cut a small corner, and pipe it over the layers for even distribution.
Nutrition
- Calories: 457kcal per serving
- Sugar: 32g
- Fat: 29g
- Saturated Fat: 12g
- Carbohydrates: 44g
- Fiber: 4g
- Protein: 8g
- Cholesterol: 12mg
Final Thoughts
There’s something truly special about recreating iconic treats from beloved places like Disneyland. These Disneyland Peanut Butter Squares are a testament to the power of food to evoke memories and bring joy. Whether you’re a Disney fanatic or just someone who loves a good dessert, this recipe is a must-try.