
Easy Bunny Easter Cookies: A Fun and Festive Treat for the Whole Family
Easter is just around the corner, and what better way to celebrate than with a batch of adorable and delicious Easy Bunny Easter Cookies? These Bunny Butt Cookies are not only a joy to make but also a delightful treat to share with family and friends. Featuring little bunny paws made with marshmallows and a cute white marshmallow tail, these frosted Easter cookies are sure to be a hit at any Easter gathering. In this post, we’ll walk you through the step-by-step process of creating these festive treats, along with tips and tricks to make the process as smooth as possible. So, let’s hop right in!
Why You’ll Love These Easy Bunny Easter Cookies
Before we dive into the recipe, let’s talk about why these Bunny Butt Cookies are a must-try this Easter:
- Adorable and Festive: These cookies are almost too cute to eat! The bunny paws and tail make them perfect for Easter celebrations.
- Easy to Make: Despite their intricate appearance, these cookies are surprisingly simple to make, even for beginners.
- Kid-Friendly: This is a great recipe to involve kids in the kitchen. They’ll love helping to decorate the cookies with marshmallows and sprinkles.
- Customizable: You can use your favorite cookie base and frosting flavors to make these treats uniquely yours.
- Perfect for Gifting: Pack these cookies in a cute box or bag, and they make a wonderful Easter gift for friends, teachers, or neighbors.
Equipment You’ll Need
To make these Easy Bunny Easter Cookies, you’ll need a few basic kitchen tools. Here’s what you’ll need to gather before you start:
- Small plates: For holding the colored sugar sprinkles.
- Frosting knife or butter knife: For spreading the frosting on the cookies.
- Kitchen scissors: To cut the marshmallows into the perfect shape for bunny paws.
- Frosting bag or zip-top baggie: For piping the pink frosting onto the marshmallows.
- Plastic wrap: To store the decorated cookies in the refrigerator.
Ingredients for Easy Bunny Easter Cookies
The ingredients for these Bunny Butt Cookies are simple and easy to find. Here’s what you’ll need:
- Round cookies: You can use store-bought sugar cookies or make your own from scratch.
- Pink and white frosting: Store-bought frosting works well, but you can also make your own for a homemade touch.
- Regular size marshmallows: These will be used to create the bunny paws.
- Mini marshmallows: These will serve as the bunny tails.
- Sanding sugar sprinkles: Choose pastel colors like pink, yellow, or blue to give your cookies a festive Easter look.
Step-by-Step Instructions for Making Bunny Butt Cookies
Now that you have all your equipment and ingredients ready, let’s get started on making these adorable Easy Bunny Easter Cookies!
Step 1: Prepare the Cookies
Start by placing your round cookies on a clean, flat surface. If you’re using store-bought cookies, make sure they’re at room temperature. If you’re baking your own, allow them to cool completely before decorating.
Step 2: Frost the Cookies
Using a frosting knife or butter knife, spread a thin layer of white frosting on top of each cookie. Make sure the frosting is evenly distributed, as this will serve as the base for the rest of the decorations.
Step 3: Add the Colored Sugar
Pour your sanding sugar sprinkles onto separate small plates. Gently press the frosted side of each cookie into the sprinkles, ensuring that the entire surface is covered. This will give your cookies a colorful and festive look.
Step 4: Prepare the Pink Frosting
Place the pink frosting in a frosting bag or in the corner of a zip-top baggie. If using a baggie, snip off a small corner to create a piping tip. This will allow you to easily pipe the frosting onto the marshmallows.
Step 5: Create the Bunny Paws
Take the regular size marshmallows and cut them in half using kitchen scissors. You’ll need two halves for each cookie to create the bunny paws. Use the pink frosting to draw little bunny feet on the non-sticky side of the marshmallow halves. Be creative with the design—you can make three small dots for the toes or a simple paw print.
Step 6: Attach the Bunny Paws
Add a small dot of pink frosting to the sticky side of the marshmallow halves. This will act as glue to attach them to the frosted cookies. Press the bunny paws onto the cookies, positioning them near the bottom edge to resemble the feet of a bunny.
Step 7: Add the Bunny Tail
Take a mini marshmallow and place a dot of pink frosting on the bottom. Press the mini marshmallow onto the center of the cookie, just above the bunny paws. This will create the bunny’s tail.
Step 8: Refrigerate the Cookies
Once all the cookies are decorated, place them in the refrigerator to allow the frosting to set. Cover them with plastic wrap to prevent them from drying out.
The History and Significance of Easter Cookies
Easter is a time of celebration, renewal, and joy, and food plays a central role in many of its traditions. Cookies, in particular, have become a staple of Easter festivities, often shaped and decorated to reflect the themes of the season. The tradition of baking Easter cookies dates back centuries, with roots in European customs where sweet treats were made to celebrate the end of Lent. Over time, these cookies evolved to include festive shapes like bunnies, eggs, and flowers, symbolizing new life and springtime.
The Easy Bunny Easter Cookies we’re making today are a modern twist on this age-old tradition. The bunny, a symbol of fertility and rebirth, has long been associated with Easter, making these cookies a perfect addition to your holiday table. The use of marshmallows to create bunny paws and tails adds a playful touch, while the pastel-colored sprinkles evoke the soft hues of spring. These cookies are not just a treat for the taste buds but also a way to connect with the rich cultural history of Easter celebrations.
Baking and decorating cookies is also a wonderful way to bring families together. Whether you’re passing down a cherished family recipe or creating new traditions, the act of making Bunny Butt Cookies can be a meaningful and memorable experience. It’s a chance to slow down, enjoy the process, and create something beautiful and delicious. So, as you prepare these cookies, take a moment to appreciate the history and symbolism behind them, and share that story with your loved ones as you enjoy your creations.
Tips for Decorating Perfect Bunny Butt Cookies
Decorating Easy Bunny Easter Cookies is a fun and creative process, but it can also be a bit tricky if you’re new to working with marshmallows and frosting. Here are some tips to help you achieve picture-perfect results:
- Choose the Right Cookies: Start with a sturdy base. Sugar cookies or shortbread cookies work best because they hold their shape and provide a solid surface for decorating. If you’re baking your own, make sure they’re fully cooled before adding frosting.
- Use Fresh Marshmallows: Fresh marshmallows are easier to cut and shape than stale ones. If your marshmallows have been sitting in the pantry for a while, consider buying a new bag for this project.
- Cut Marshmallows with Clean Scissors: To create the bunny paws, cut regular-sized marshmallows in half using clean kitchen scissors. If the scissors get sticky, wipe them with a damp cloth to ensure clean cuts.
- Pipe with Precision: When adding the pink frosting to the marshmallows, use a piping bag or a zip-top bag with a small corner cut off. This will give you better control and allow you to create neat, detailed designs for the bunny feet.
- Work in Batches: If you’re making a large number of cookies, work in small batches to keep the frosting from drying out. Cover any unused frosting with a damp cloth to prevent it from hardening.
- Let Kids Help: Decorating these cookies is a great activity for kids. Let them handle the sprinkles or place the marshmallows on the cookies. It’s a fun way to get them involved in the kitchen.
By following these tips, you’ll be able to create Bunny Butt Cookies that are as beautiful as they are delicious. Don’t worry if they’re not perfect—imperfections add charm and make them uniquely yours!
Creative Variations for Your Bunny Butt Cookies
While the classic Easy Bunny Easter Cookies are a hit on their own, there’s plenty of room for creativity and personalization. Here are some fun variations to try:
- Different Cookie Bases: Instead of plain sugar cookies, experiment with other flavors. Chocolate cookies, lemon cookies, or even gluten-free options can add a unique twist to the recipe.
- Alternative Frosting Colors: While pink and white are traditional, you can switch things up with other pastel colors like lavender, mint green, or baby blue. These colors can give your cookies a fresh, modern look.
- Add Sprinkles or Edible Glitter: For an extra touch of sparkle, mix edible glitter into your sanding sugar or sprinkle it over the frosted cookies before adding the marshmallows.
- Use Different Candies: If you don’t have marshmallows on hand, you can use other candies to create the bunny paws and tail. For example, small white chocolate chips or fondant can work as tails, while pink jelly beans can serve as feet.
- Create a Bunny Face: Turn your cookies into full bunny faces by adding edible eyes, a pink candy nose, and piped frosting whiskers. This variation is perfect for those who want to take their decorating skills to the next level.
- Make It a Dessert Platter: Pair your Bunny Butt Cookies with other Easter-themed treats like chocolate eggs, carrot cake cupcakes, or rice cereal nests. This creates a stunning dessert platter that’s sure to impress your guests.
Tips for Perfect Easy Bunny Easter Cookies
- Use Fresh Marshmallows: Fresh marshmallows are easier to cut and shape than stale ones.
- Experiment with Colors: While pastel colors are traditional for Easter, feel free to get creative with your color choices.
- Make Ahead: You can bake and frost the cookies a day in advance and add the marshmallow decorations on the day you plan to serve them.
- Store Properly: Keep the decorated cookies in an airtight container in the refrigerator to maintain their freshness.
Frequently Asked Questions (FAQs)
Can I Use Different Shapes for the Cookies?
Absolutely! While round cookies work best for this design, you can experiment with other shapes like eggs or flowers for a unique twist.
Can I Make These Cookies Gluten-Free?
Yes, simply use gluten-free cookies and ensure that all other ingredients, including the marshmallows and frosting, are gluten-free.
How Long Do These Cookies Last?
When stored properly in the refrigerator, these cookies can last up to 3-4 days. However, they’re best enjoyed within 1-2 days of decorating.
Can I Freeze These Cookies?
Yes, you can freeze the undecorated cookies for up to a month. Add the marshmallow decorations after thawing and bringing them to room temperature.
Easy Bunny Easter Cookies: A Fun and Festive Treat for the Whole Family
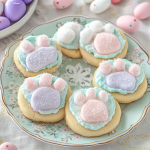
These adorable Bunny Butt Cookies are the perfect treat for Easter or any springtime celebration! Featuring cute bunny paws made from marshmallows and a fluffy white tail, these cookies are as fun to make as they are to eat. They’re great for baking with kids or adding a festive touch to your dessert table. Follow the simple steps below, and don’t forget the tips for success
Ingredients
- Round cookies (store-bought or homemade)
- Pink and white frosting
- Regular-size marshmallows
- Mini marshmallows
- Sanding sugar sprinkles (pink or pastel colors)
Equipment:
- Small plates
- Frosting knife or butter knife
- Kitchen scissors
- Frosting bag or zip-top baggie
Instructions
- Prepare the Cookies:
- Spread a thin layer of white frosting on top of each cookie using a frosting knife or butter knife.
- Add Colored Sugar:
- Pour the sanding sugar sprinkles onto separate small plates.
- Press the frosted side of each cookie into the colored sugar to coat it evenly.
- Create Bunny Feet:
- Cut the regular-size marshmallows in half using kitchen scissors.
- Place pink frosting in a frosting bag or a zip-top baggie with the corner cut off.
- Pipe small pink dots onto the non-sticky side of the marshmallow halves to create bunny paw pads.
- Attach the Feet:
- Add a small dot of pink frosting to the sticky side of the marshmallow halves to act as glue.
- Press the bunny feet onto the frosted cookies, positioning them near the bottom edge.
- Add the Bunny Tail:
- Place a dot of pink frosting on the bottom of a mini marshmallow.
- Press the mini marshmallow onto the center-top of the cookie to create a fluffy bunny tail.
- Chill and Serve:
- Store the decorated cookies in the refrigerator, covered with plastic wrap, until ready to serve.
Notes
- Use store-bought round cookies or bake your favorite sugar cookie recipe to save time.
- If you don’t have sanding sugar sprinkles, you can use colored sugar or even edible glitter for a sparkly effect.
- Keep the marshmallows fresh by storing them in an airtight container until ready to use.
- Chill the cookies before serving to help the frosting set
Nutrition
- Calories: 120 kcal per cookie
- Sugar: 15g
- Fat: 4g
- Carbohydrates: 20g
- Protein: 1g
Conclusion
These Easy Bunny Easter Cookies are a fun, festive, and delicious way to celebrate the holiday. With their cute bunny paws and tails, they’re sure to bring a smile to everyone’s face. Whether you’re baking with kids, hosting an Easter party, or simply looking for a sweet treat to enjoy, these Bunny Butt Cookies are the perfect choice. So, gather your ingredients, put on your apron, and get ready to create some Easter magic in the kitchen!