Easter Chick Dipped Wafer Cookies: A Fun & Easy Easter Treat!
Easter is just around the corner, and what better way to celebrate than with these adorable Easter Chick Dipped Wafer Cookies? These cute, crunchy, and delicious treats are perfect for Easter parties, classroom snacks, or just a fun family baking project. Not only are they irresistibly cute, but they’re also incredibly easy to make—requiring just a few simple ingredients and minimal prep time.
In this post, I’ll walk you through everything you need to know to make these delightful Easter Chick Dipped Wafer Cookies, including ingredient substitutions, decorating tips, storage recommendations, and more. Plus, I’ll share why these cookies are a must-make for your Easter festivities!
Why You’ll Love These Easter Chick Dipped Wafer Cookies
✅ Quick & Easy – Ready in under 30 minutes!
✅ Kid-Friendly – Perfect for little helpers to decorate.
✅ Customizable – Use different sprinkles for unique designs.
✅ Festive & Fun – A guaranteed hit at Easter gatherings.
✅ No-Bake – No oven required!
If you’re looking for a simple yet impressive Easter dessert, these Easter Chick Dipped Wafer Cookies are the answer.
Ingredients for Easter Chick Dipped Wafer Cookies
Here’s what you’ll need to make these adorable treats:
Main Ingredients
▢ 1 package sugar wafer cookies (any flavor—vanilla, strawberry, or chocolate work great!)
▢ 1 cup yellow candy melts (for that bright chick color)
▢ 1 tablespoon coconut oil (helps thin the candy melts for smooth dipping)
Decorations
▢ 60 candy eyeballs (2 per cookie)
▢ 60 round orange sprinkles (for the beak)
▢ 60 orange flower-shaped sprinkles (for the feet)
▢ 60 yellow leaf-shaped sprinkles (for the hair)
Note: If you can’t find flower or leaf sprinkles, any small orange and yellow sprinkles will work—just get creative!
Step-by-Step Instructions
Step 1: Melt the Yellow Candy Coating
- In a microwave-safe bowl, combine the yellow candy melts and coconut oil.
- Microwave in 30-second intervals, stirring between each, until fully melted and smooth (about 3-5 minutes total).
Pro Tip: If the coating is too thick, add a little more coconut oil (½ tsp at a time) until it reaches a dippable consistency.
Step 2: Prepare the Cookies for Dipping
- Line a baking sheet with parchment paper and place a wire rack on top (this catches excess drips).
- Arrange the sugar wafer cookies on the wire rack.
Step 3: Dip or Pipe the Cookies
There are two ways to coat the cookies:
Option 1: Piping (Recommended for Precision)
- Transfer the melted candy into a piping bag (or a zip-top bag with a tiny corner snipped off).
- Starting at the top of the cookie, pipe the melted candy in a back-and-forth motion, covering about two-thirds of the wafer.
Option 2: Dipping (Faster but Messier)
- Hold a wafer cookie and dip it into the melted candy, covering two-thirds of it.
- Let the excess drip off before placing it back on the rack.
Step 4: Decorate Your Easter Chicks
Work quickly before the candy coating sets!
- Add the Eyes – Use tweezers to place 2 candy eyeballs near the top.
- Create the Beak – Place 2 orange round sprinkles just below the eyes.
- Feet & Hair – Add flower sprinkles at the bottom for feet and leaf sprinkles on top for hair.
Step 5: Let Them Set
Allow the cookies to harden completely (about 10 minutes) before serving or packaging.
The Best Sugar Wafer Cookies for Easter Chick Treats
When making Easter Chick Dipped Wafer Cookies, the type of wafer cookies you choose can make a big difference in both taste and texture. The classic vanilla sugar wafers are the most popular choice because their neutral flavor pairs well with the sweet yellow candy coating. However, you can also experiment with strawberry or chocolate wafers for a fun twist.
If you want a crunchier texture, opt for thinner wafers, as they hold up better when dipped in melted candy. Thicker wafers may become too soft if the coating is too warm. For a gluten-free version, many brands offer gluten-free sugar wafers that work just as well.
Another great thing about using wafer cookies is that they’re naturally light and crispy, making them the perfect base for a candy-coated treat. Unlike heavier cookies, wafers won’t overwhelm the sweetness of the candy melts, ensuring a balanced bite every time.
Pro Tip: If you can’t find pre-packaged sugar wafers, you can make your own at home using a simple wafer recipe. However, store-bought wafers save time and are just as delicious for this project!
How to Perfectly Melt Candy Coating for Dipping
One of the most important steps in making Easter Chick Dipped Wafer Cookies is melting the candy coating correctly. If the candy melts are overheated, they can become too thick or grainy, making dipping difficult. Here’s how to get it right every time:
- Use a Microwave-Safe Bowl – Glass or ceramic works best.
- Add Coconut Oil – This helps thin the candy melts for smoother dipping (about 1 tablespoon per cup of melts).
- Microwave in Short Intervals – Heat in 30-second bursts, stirring between each, until fully melted.
- Avoid Overheating – If the candy gets too hot, it can seize up and become unusable.
If you don’t have a microwave, you can use a double boiler on the stove. Simply place the candy melts in a heatproof bowl over simmering water, stirring until smooth.
Troubleshooting Tips:
- If the coating is too thick, add a bit more coconut oil.
- If it hardens too fast, reheat for a few seconds.
- If it becomes lumpy, stir in a teaspoon of vegetable oil to smooth it out.
Creative Decorating Ideas for Easter Chick Cookies
The best part of making Easter Chick Dipped Wafer Cookies is decorating them! While the classic version uses candy eyes, orange sprinkles for beaks, and flower-shaped feet, you can get creative with different designs. Here are some fun variations:
1. Pastel Chicks
Instead of yellow, try pink, blue, or lavender candy melts for a spring-themed look.
2. Cheeky Chicks
Add tiny pink sprinkle cheeks next to the beak for an extra-cute touch.
3. Mini Egg Nests
Place a mini chocolate egg next to the chick to make it look like it’s sitting in a nest.
4. Edible Marker Details
If you don’t have small sprinkles, use an edible food marker to draw on eyes, beaks, and feet.
5. Glittery Feathers
Tips for Perfect Easter Chick Dipped Wafer Cookies
✔ Use High-Quality Candy Melts – Cheap melts may not set properly.
✔ Keep Decorations Organized – Place sprinkles in small bowls for easy access.
✔ Work in Batches – Decorate 3-4 cookies at a time to prevent the coating from hardening.
✔ Store Properly – Keep in an airtight container at room temperature for up to 5 days.
Variations & Substitutions
Different Flavors & Colors
- Pink or Blue Chicks – Use pastel candy melts for a fun twist.
- Chocolate Wafers – Adds a richer flavor.
Alternative Decorations
- Mini Chocolate Chips – For eyes instead of candy eyeballs.
- Edible Marker – Draw faces if you don’t have sprinkles.
Allergy-Friendly Options
- Dairy-Free – Ensure candy melts are dairy-free.
- Gluten-Free – Use gluten-free wafer cookies.
Frequently Asked Questions (FAQs)
Can I Use White Chocolate Instead of Candy Melts?
Yes, but you’ll need to add yellow food coloring (oil-based works best).
How Do I Prevent the Candy Coating from Cracking?
- Avoid overheating the candy melts.
- Add a little coconut oil for flexibility.
Can I Make These Ahead of Time?
Absolutely! Store in an airtight container for up to 5 days.
Easter Chick Dipped Wafer Cookies: A Fun & Easy Easter Treat!

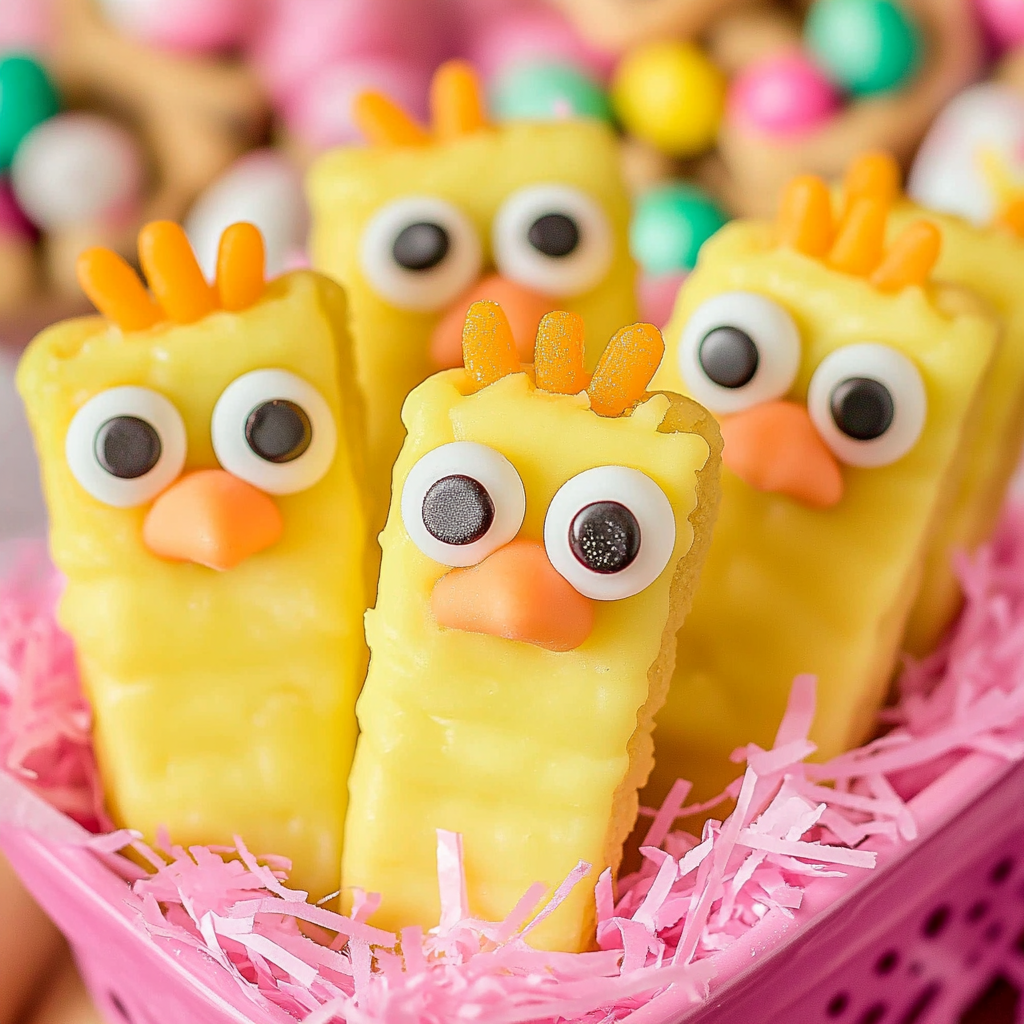
These adorable Easter Chick Dipped Wafer Cookies are a fun and easy treat that kids (and adults!) will love! Crispy, cream-filled sugar wafers are dipped in melted yellow candy, then decorated with candy eyes and sprinkles to create cute little chicks. They’re almost too cute to eat—but trust us, they’re delicious!
- Prep Time: 5 minutes
- Cook Time: 20 minutes
- Total Time: 25 minutes
Ingredients
- 1 package sugar wafer cookies (any flavor)
- 1 cup yellow candy melts
- 1 tablespoon coconut oil (or vegetable oil)
- 60 candy eyeballs (2 per cookie)
- 60 round orange sprinkles (for beaks)
- 60 orange flower-shaped sprinkles (for feet)
- 60 yellow leaf-shaped sprinkles (for hair)
Instructions
- Melt the Candy Coating:
- In a microwave-safe bowl, combine yellow candy melts and coconut oil.
- Microwave in 30-second intervals, stirring in between, until fully melted and smooth (about 1.5-2 minutes total).
- Transfer to Piping Bag (Optional):
- Pour melted candy into a piping bag (or use a spoon for dipping).
- Dip & Decorate the Cookies:
- Place wafers on a wire rack over parchment paper to catch drips.
- Pipe or drizzle melted candy over the top ⅔ of each cookie, letting excess drip off.
- Immediately add:
- 2 candy eyes
- 2 orange flower sprinkles (feet)
- 2 yellow leaf sprinkles (hair)
- 1 orange round sprinkle (beak)
- Let Set:
- Allow cookies to harden completely (about 10 minutes) before serving or storing.
Notes
✔ Use tweezers for precise placement of sprinkles.
✔ If the candy melts thicken, add a little more coconut oil to keep them smooth.
✔ Let the cookies set on a wire rack to avoid pooling.
✔ Get creative with sprinkles—any small orange or yellow shapes work for beaks and feathers!
Nutrition
- Calories: 21kcal per serving
- Sugar: 2g
- Sodium: 4mg
- Fat: 1g
- Saturated Fat: 1g
- Carbohydrates: 2g
- Protein: 0.001g
Final Thoughts
These Easter Chick Dipped Wafer Cookies are the perfect combination of fun, festive, and delicious! Whether you’re making them for an Easter brunch, gifting to friends, or just enjoying with family, they’re sure to bring smiles all around.